Iron gall ink was the most popular form of ink for writing medieval manuscripts, so we, a group of medieval literature students, made some of our own. Now we’re ready to teach you, an aspiring medieval scribe, how to do it well.
To begin we searched for and attempted to convert a medieval iron gall ink recipe, and our many struggles began. From the Yale University Library’s Medieval to Early Modern Manuscripts: Some Ink and Pigment Recipes we sourced a thirteenth-century Latin recipe, converted to French, and later translated it into English, and with it, we realized that medieval measurements are vastly different than what we are used to. Here’s how it went (the original recipe is in bold):
“Take an earthen vase (or jar or pan) that can contain 8 pounds of water”
An earthen vase, for us, meant a small cooking pot.
Also, the imperial pound we measure with today is different than the medieval pound. As we started measuring and pouring the water, we realized some of our original conversions did not work, so we reconfigured them as we went–winging it!
We used ratios to scale the recipe down, and our non-math brains calculated 9 cups of water from three medieval pounds, which is still a lot of water. The recipe’s 8 pounds of water worked in medieval times since whoever made the ink made huge batches at a time; however, we weren’t seeking mass production. Plus our small cooking pot limited us to about 3 cups of water.
“then (add) a pound of small gall nuts and crush them well”
We reduced the pound of gall nuts to one cup and crushed them with our mortar and pestle. It was quite a workout; those little guys were very stubborn.


“then boil until (the water, the mixture) is reduced by half”
Once we completed our arm workout, we boiled the crushed galls in the water. They say a watched pot never boils, but ours sure did! Once it was rolling, we waited until half of the water evaporated.


To confirm water had reduced halfway we used a very scientific tool –the chopstick. We marked our original water line into the wood and compared the water level every couple of minutes until it measured halfway up to the line.
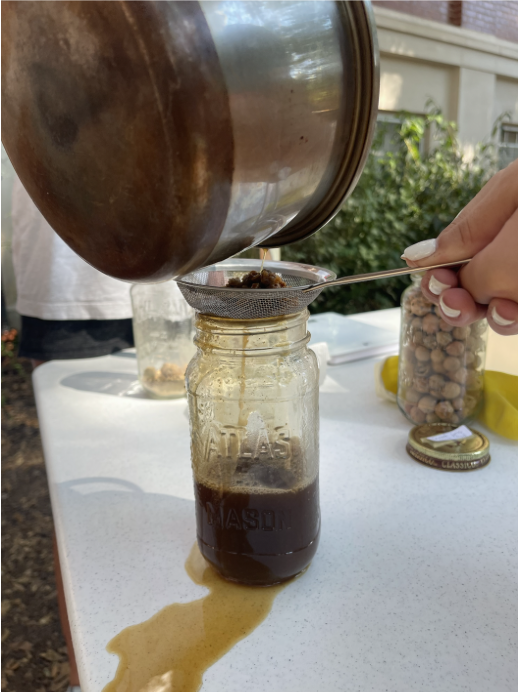
Then it was time to remove the remaining oak gall pieces. Using a strainer, our group transferred the darkened liquid to a jar. Then it was back to the pot to mix in the rest of the ingredients.

“then take three ounces of gum arabic and grind it well”
While we waited for our water to evaporate, we measured the gum arabic and vitriol. Once again, we cut our original measurements down to balance with the rest of the ingredients. To add to our struggles, our scale wasn’t very sensitive, and we ended up guesstimating our vitriol and gum arabic weights. We ended up with about two grams of each.


“and pour (add) the gum to the mixture in the jar and boil it until reduced by half”
This step is pretty self-explanatory. More boiling, waiting, and chopstick-measuring.
“Remove the jar from the fire and take four ounces of vitriol and one pound of warm wine and mix them together in another jar and add little by little to the ink, stirring well.”


Our recipe called for one cup of warm wine to dissolve the vitriol. FYI, modern wine is very different from medieval wine. It contains more sulfites which slow down the oxygenation process. However, we didn’t use much, so we weren’t too worried.
“Leave it to rest for two days”
You’ve made it to the end! Last steps! We dissolved the gum arabic into our warm oak gall liquid, added the wine and vitriol mixture, and let it sit on the stove until it darkened to black. Finally (finally!!), we poured our ink into a cute little jar, where we, as the recipe specified, let it rest.
“and afterwards, every day, stir four times with a stick.”
Well, dear scribe, you made the ink, sealed it up, and let it rest… Now what?
It’s time to write!
Just a heads up, your ink may appear lighter than you expect when you start writing. Don’t worry! The final ingredient for successful iron gall ink is oxygen. When exposed to oxygen, the ink gradually darkens, so initially, the ink appears lighter because the final chemical reaction is still in progress.
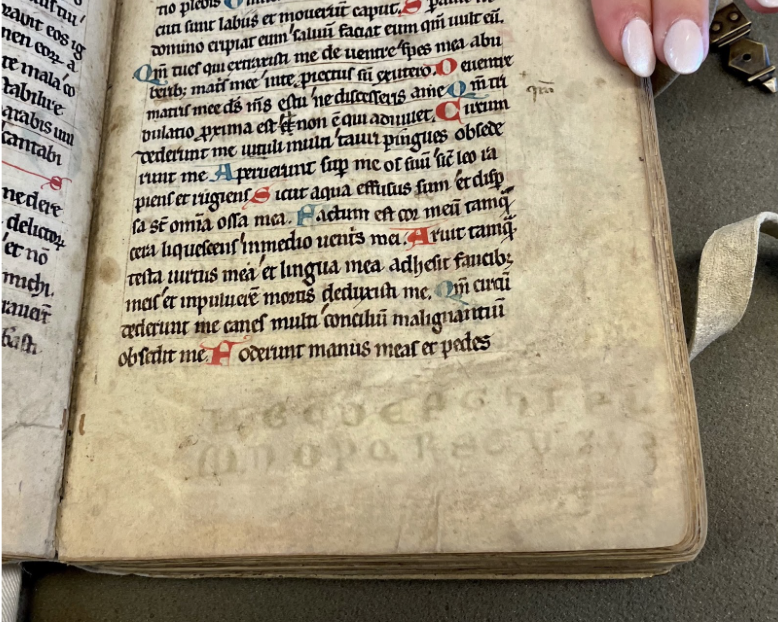
Now that you know how to make this popular medieval ink, I bet you’re wondering why scribes used iron gall ink so often. Other options for ink, like carbon black, also produced a dark shade suitable for writing, but iron gall ink is especially resilient. Due to its acidity, iron gall ink basically eats into its substrate. Strange, right? But that means it lasts much longer since it sort of becomes part of the substrate. We find evidence of this when we look at manuscripts with shadows of “erased” text.
You can see below someone’s attempt to erase, using a sharp penknife, some letters at the bottom of this manuscript leaf. The letters become a shadow of themselves thanks to the corrosiveness of iron gall ink. This quality is useful today because it gives us hints about the various functions of these manuscripts. So be forewarned, young scribe, that if you err, we just might see it!
(This faintly visible alphabet was scratched off of the parchment. This evidences the permanence of this ink and its corroding qualities. Les Enluminures, TM 789, fol. 14r.)
Alright, you have now completed a crash course on how to make ink! Go forth and copy exemplars to your heart’s content. And if you’re feeling especially studious, check out some of the other teams’ guides to medieval manuscripts!
Works Consulted
Eusman, Elmer. “Iron gall ink – Chemistry.” The Iron Gall Ink Website, 1998, https://irongallink.org/iron-gall-ink-chemistry.html. Accessed 29 November 2022.
Les Enluminures, TM 644, Cologne Office of the Dead,
https://www.textmanuscripts.com/medieval/manuscript-office-of-the-dead-60899/
Les Enluminures, TM 789, Constance Psalter,
https://www.textmanuscripts.com/medieval/medieval-german-psalter-79751
Medieval to Early Modern Manuscripts: Some Ink and Pigment Recipes. Yale University Library, 2014.
