As Bridget Ruth Whearty’s “Making a Digital Medieval Manuscript” blog post tells us, “Medieval manuscript scholars are increasingly interested in experiencing how medieval books were made.” As such, Stanford Libraries have their students craft books, “medieval-scribe-style,” for the sake of experiential learning. Dr. Camp also assigned this useful exercise. In our class, the groups of the undergraduate students made their own quires, and it was the graduate students’ job to bind them together. As an experiential learning exercise, I did learn a lot, though the main takeaway is that building a book from scratch is HARD. One needs a lot of patience, and also a willingness to let something be not perfect, or you will never finish.


I worked in the cataloguing department at University of New Orleans’ Earl K. Long Library for several years. My main job involved
receiving and shelving periodicals, but because I was interested in book production, I was also taught basics of book repair. We rarely did a complete tear down of a book, to where we only had the text block and build the rest of the binding around it, but I had done a few. As a result, I was perhaps too confident going into this project. There are only two graduate students, so I did the hands on part while Lainie Pomerleau documented it. This post is not a step by step guide to binding a book, but simply the basic and a few reflections on it. The guide will likely be about twenty+ pages long. As I said, building a book from scratch is hard.
At first, I was planning on doing an all-the-way medieval binding: actual wood for boards, drilling holes in them for the supports, figuring out how to construct a spine. That is not what happened, but I feel pretty confident that had scribes had access to strong enough glue, they would have gone with my method. I still have no idea how the spines were constructed, so went with the modern version. I also went with a modern sewing style, though I believe it is fairly similar to medieval versions.
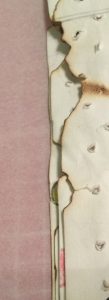
The first challenge arose from one of the undergrad group’s quire. Instead of keeping the pages as a booklet of folded pages, they cut them in half and sewed them together down the left side. It looked really cool, but there was no way to sew it to the other quires. As you can see in Figure 1, I needed a fold to keep all the pages of the quire together, as well as to sew them to the next one. I had to improvise, by gluing the individual, cut pages onto a piece of thick paper, which I then used as my sewing support. The process is similar to how you would reattach pages of a paperback text block. The result was not perfect at all, but got the job done. I also accidentally flipped one of the pages. Pretty medieval, right?
Next, I had to sew all the quires together. At this point, I had given up on trying to find any sort of “authentic” sewing supports, so bought some book tape. That meant that I also did not sew the quires directly to the tape, but instead threaded the tape through the sewing. I’m getting ahead of myself; let me explain sewing the quires together.
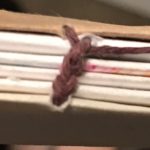
The tutorials from Crafty Loops proved to be very useful in sewing the quires (here, signatures) together. I took the coptic binding workshop at the International Congress of Medeival Studies in Kalamazoo, MI last year, but couldn’t remember exactly how it worked. The result of her method leaves lines of stitches resembling coptic stiching at the top and bottom of the quires (see Figure 4), where a full coptic stitching would have, with this book, five rows. The row of coptic stitches secure the quires to each other, while the other stitches secure the pages of the quire to each other. They also leave thread outside the “spine” of each quire that you can thread book tape through (See Figure 5).

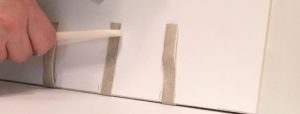
After all the quires were sewn together, I had to attach them to the cover. No craft stores in our area had good boards to work with, or really anything good at all for making a hardcover book. We ended up using the same type of poster board used for presentations, which I glued double- thick so it would have a good weight to it. Once we had to give up on using actual boards for the cover, I gave up on boring holes into it. If you don’t know, in medieval books, the sewing supports (in this instance, booktape) is threaded through boards from the outer edge of the cover to the inside, and then secured with pegs. I imagine this creates a very stable binding. Instead, I simply glued the book tape to the outside of the cover.This would retain the cool texture you see on the cover of medieval books, where the leather is slightly raised over the sewing supports, but I wouldn’t have to drill a hole in poster board I just glued together. In Figure 6, I am using a bone tool to flatten the book tape on the outside of the cover. The pressure spreads out the glue evenly on the tape and the cover, and makes sure there are no air bubbles.
There are many instances in this process going forward where you leave the book to dry for several hours or longer. I usually left it overnight to make sure glue dried completely. I won’t mention every time this happened going forward, but know that every time I mention gluing something, that there were at least a few hours that the book sat wrapped in wax paper with many other books on top to keep it flat.
Since my research revealed no information on how medieval scribes made spines, I went with the version I learned at the library. You measure the section of the textblock (the sewn quires) and cut a piece of cardboard the length and width of the text block. I added an eight of an inch at the top and the bottom of the spine, as well as on all sides of the cover. Medieval covers were the exact size of the textblock, which is a preservationists nightmare. If stored upright on a shelf, the pages would rub on the shelf, messing them up. Since this book was probably going to be on a shelf, I went with a cover and spine slightly larger than quires.
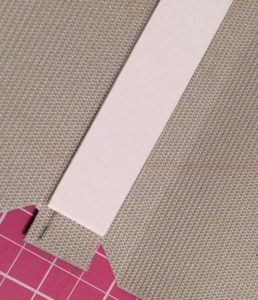
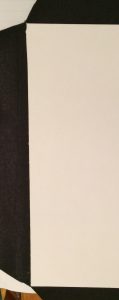
I glued the spine to the faux-leather we were using on the cover. In Figure 7, you’ll see it attached to the fabric, and cuts around the top. Without going into too much detail, you cut the fabric around the top of the spine and at the corners of the cover to make it easier to fold around. Next, you glue the fabric to the outside of the cover, making sure no glue gets on the actual pages of the manuscript. If you are a future class member, look to the detailed instructions for the rest of this process. Once the fabric is glued to the outside of the cover, you glue the excess to the inside of the cover, folding it over the edges and using a bone tool so it lies flat and the glue is evenly spread (See Figure 8). **note that the fabric in figure 7 and 8 is different; the original fabric was too thick. It won’t change color in the binding process.
Once you have secured the fabric to both the outside and inside of the cover, it starts to look like a book. Unfortunately, you are not finished yet. Modern books have what are called endsheets, which manuscript scholars call pastedowns. These folded pieces of paper or parchment cover the leather, making it look nicer, since you don’t see the edges of it. They also serve a protective purpose: keeping the leather or other decorations from touching the quires. This could cause staining in the case of leather, or tears, in the case of books with
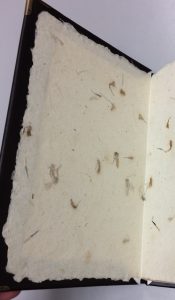
ornamentation that has worn through the wooden boards, potentially poking into the text itself. You glue the outer half of one of the folded sheets to the inside of the cover, making sure no glue gets on the quires. The other side is not secured to the
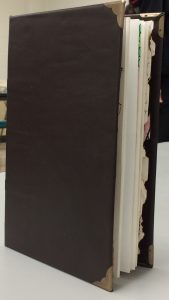
textblock or the cover. I used paper handmade by my friend Hope from GutWrench Press as endsheets. After you have endsheets on both covers, add any decoration you want. Lainie found corner protectors, so I added those. The other decorations we had looked like they should have been attached to the fabric before I glued it to the cover, but that is way beyond my skillset. Maybe one day I can reproduce a treasure binding, but not yet. I’ll leave that to future students in this class.
–JH Roberts, PhD Student
All photographs by JH Roberts and Lainie Pomerleau
Save
Save
Save